Course Tour

| HOLE | 1 | 2 | 3 | 4 | 5 | 6 | 7 | 8 | 9 | OUT |
|---|---|---|---|---|---|---|---|---|---|---|
| Blue 72/143 | 569 | 142 | 398 | 400 | 170 | 372 | 383 | 378 | 432 | 3244 |
| White 74.3/140 | 540 | 132 | 386 | 382 | 144 | 360 | 354 | 342 | 396 | 3036 |
| Red 69.6/128 | 418 | 120 | 323 | 311 | 139 | 333 | 312 | 284 | 364 | 2604 |
| PAR | 5 | 3 | 4 | 4 | 3 | 4 | 4 | 4 | 4 | 35 |
| Men's Handicap | 3 | 17 | 1 | 7 | 15 | 11 | 13 | 13 | 5 | |
| Women's Handicap | 7 | 17 | 1 | 9 | 13 | 5 | 15 | 15 | 3 |
| HOLE | 10 | 11 | 12 | 13 | 14 | 15 | 16 | 17 | 18 | IN | TOTALS |
|---|---|---|---|---|---|---|---|---|---|---|---|
| Blue 72/143 | 506 | 170 | 351 | 353 | 361 | 378 | 544 | 377 | 431922 | 3232 | 6476 |
| White 74.3/140 | 467 | 138 | 315 | 317 | 330 | 318 | 477 | 328 | 149 | 2839 | 5875 |
| Red 69.6/128 | 389 | 91 | 293 | 283 | 300 | 260 | 392 | 240 | 102 | 2350 | 4954 |
| PAR | 5 | 3 | 4 | 4 | 4 | 4 | 5 | 4 | 3 | 36 | 71 |
| Men's Handicap | 6 | 16 | 18 | 4 | 12 | 14 | 8 | 2 | 10 | ||
| Women's Handicap | 10 | 14 | 8 | 2 | 4 | 16 | 6 | 18 | 12 |
-
Hole #1
Men's Handicap: 3
Women's Handicap: 7
Hole 1
Par 5
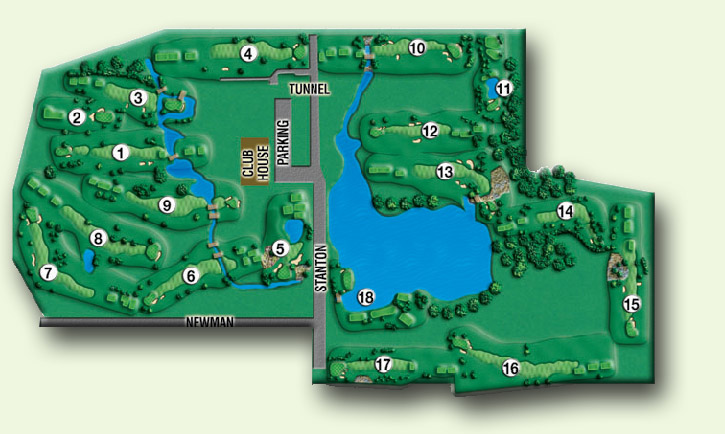
The challenge starts early with our par 5 #3 handicap. It plays a little longer then the yardage indicates due to its uphill slope for the first 400 yards and typical prevailing breeze in your face. The tee shot over the Paint Creek to the landing area is protected by 2 large sand bunkers on the left and trees on the right. The green is protected on the front right by a bunker and trees and on the left by another larger bunker. It slopes from back to front and, as with many of the greens at Paint Creek contains very few flat putts. It is a very challenging hole from the blue tee for the lower handicap players but still enjoyable for the average players from the middle and front tees.• • • 569 540 418 -
Hole #2
Men's Handicap: 17
Women's Handicap: 17
Hole 2
Par 3
Hole number 2 is a par 3 that reads 142 yards from the blue tee; 132 yards from the white and 120 yards from the red. However, like number 1, the hole plays uphill so plays a little longer than the card yardage. The green is protected by front and left side bunkers. A miss to the left will find you at the bottom of a rather steep slope where you can only see the top portion of the flag. It’s about 10 feet back up to the putting surface with a very small landing area that will allow the ball to keep from running off into the fringe on the opposite side of the green. This hole is the #17 handicap and rather short but it can be difficult to score well on especially for the higher handicap players.
• • • 142 132 120 -
Hole #3
Men's Handicap: 1
Women's Handicap: 1
Hole 3
Par 4
The par 4 hole number 3 is the #1 handicap hole at Paint Creek for good reason. You need to carry a tee shot from the blue tee 230 yards to clear the first bunker on the right and over 280 yards to clear the second. These bunkers and tough rough protect the right side of the fairway and if you choose the left side, a miss will find you with the tree line blocking your second shot to the green. Additionally, you would have to catch a real break in the rough to be able to go for the green from any distance out. Once on the green, sloping from back to front there are a lot of areas that require making putts with a lot of break involved. Regardless of your handicap, a par on number 3 is something to be proud of.
• • • 398 386 323 -
Hole #4
Men's Handicap: 7
Women's Handicap: 9
Hole 4
Par 4
Hole number 4 is our #7 handicap and the uphill tee shot may make adjustments to the card yardage necessary. The narrow valley fairway may save a marginal shots but the rough grabs most and makes for a very awkward 2nd shot. There is out of bounds both right and left. The green is protected by a bunker on the right and a very deep bunker to the left front that protects that left side tier. The green slopes severely from back to front on most of the right side So if you wind up above the hole you will be challenged to 2 putt. The left 3rd of the green is another tier and, although flatter from a putting stand point, when the pin is on the left, a long putt can put you all the way down to the lower tier. If you make a 4 be very happy.
• • • 400 382 311 -
Hole #5
Men's Handicap: 15
Women's Handicap: 13
Hole 5
Par 3
On number 5, the left side bunker is a good distance away from the green and generally not in play however many an errant shot has found it and made for a tough recoveries. The green is protected by a bunker front right and pretty steep drop offs on all sides except the front approach area. The pond in front shouldn’t cause problems for any tee shots except a real dubbed shot. Paint Creek runs behind the green but only the longest of flubs will reach it. Try and land your shot a little short of the middle of the green. If your shot flies too deep onto the surface, it may reach the downward slope that can carry even a good shot into the fringe rough at the back. Putting finds lots of subtle breaks in this green to contend with.
• • • 170 144 139 -
Hole #6
Men's Handicap: 11
Women's Handicap: 5
Hole 6
Par 4
Number 6 is a straight away par 4 and is the 11th handicap hole. It plays from an elevated tee to an elevated green. There are no fairway bunkers to trap wayward tee shots but the rough is heavy and very penalizing. An approach shot to the green from 150 yards requires an uphill shot of about 30 feet in elevation. At least 1 club more is required and it’s often into a prevailing breeze which could add another club. The green is guarded on the left by 2 large bunkers and a miss on the right will hurt if the pin is near the right side of the green as it is bowl shaped and you won’t be able to get the ball close with a chip shot. A severe slope from back to front compels you to stay short of the flag unless you don’t mind 3 or more putts.
• • • 372 360 333 -
Hole #7
Men's Handicap: 13
Women's Handicap: 15
Hole 7
Par 4
The par 4 number 7 is a sharp dogleg to the right. Your elevated tee shot is over a valley to an elevated fairway. For shots that come up short there is a pond on the right side of the fairway waiting to grab your ball. A pulled tee shot can put you out of bounds on the left. A bold player can put their tee shot inside 100 yards if they fly the trees that protect the dogleg while shorter hitters need to go for the fairway in the valley 170 to 200 yards out. This hole is all carry to the green as it is protected on the left front and right side by bunkers with a narrow opening in the front for an approach. This green slopes from left to right and back to front and if you have a flat straight putt consider yourself fortunate.
• • • 383 354 312 -
Hole #8
Men's Handicap: 13
Women's Handicap: 15
Hole 8
Par 4
Our #13 handicap, number 8 is a straight away par 4. The landing area for the higher handicap players is in a bit of a valley around 150 yards from the green. Longer hitters may take advantage of a shorter 2nd shot provided they’re comfortable with an uphill lie. If you push your tee shot, the pond between 6 and 8 fairways can grab your shot. Too far to the left and you may be blocked by the left side tree line. The approach is to a 2 tiered green and is a difficult 2 putt if you are putting from the lower tier to the upper. A lot of the breaks in this green are more subtle than most of the other holes. However, it does slope from back to front.
• • • 378 342 284 -
Hole #9
Men's Handicap: 5
Women's Handicap: 3
Hole 9
Par 4
The par 4 number 9 features a blind tee shot with a slight dogleg left, trees right and left and a difficult rough. There are no fairway bunkers so if you can manage to get your tee shot onto the right side of the fairway 220 to 250 yards out you can catch the downhill slope and pick up another 30 to 40 yards in roll. Be sure to add a club for your approach to the elevated green. Left side sand and right side grass bunkers along with a large back right beach protect the green but only the longest shots will find the rear beach. A severe back to front slope means that landing below the hole should be your top priority. Anything else and a 3 putt is likely. And that’s assuming that you don’t roll it off the green entirely.
• • • 432 396 364 -
Hole #10
Men's Handicap: 6
Women's Handicap: 10
Hole 10
Par 5
Your number 5 tee shot needs to carry a wetlands area. But it’s narrow and rarely comes into play. The landing area is protected by 2 bunkers on the left of the fairway and further out a large bunker on the right. The fairway is generous in width in the landing area but for the long hitter willing to risk left and right out of bounds, the bunkers are all flyable. Longer hitters can reach this green in 2 shots but the 2 large bunkers protecting the green leave a very small opening on the left that a shot could be rolled thru so the ball really needs to carry all the way in the air. Sloping forward, some pin placements can make you very happy to par, although, number 10 is generally considered a good birdie opportunity.
• • • 506 467 389 -
Hole #11
Men's Handicap: 16
Women's Handicap: 14
Hole 11
Par 3
The picturesque 11th is a Par 3 and the #16 handicap There is out of bounds along the right side and lateral hazard along the left. Also, the pond is definitely in play for a tee shot that is hit fat. A front bunker and very large tree on the right protect the green. Reach the steep hill behind and your shot will most likely be in a lateral hazard. There is also a large grass bunker that can catch shots that are a bit long and left. For the most fortunate, a ball hit left of the green can often catch a good bounce and land on the green. The hole does not have any bailout area so you either are on the green, very close or penalized a stroke at minimum. Many a low net opportunity is spoiled here.
• • • 170 138 91 -
Hole #12
Men's Handicap: 18
Women's Handicap: 8
Hole 12
Par 4
The par 4 number 12 is our highest handicap. It’s straight away with just a hint of a dogleg left. The fairway has a wide landing area is protected by 2 large bunkers on the right and a large bunker on the left . It slopes from right to left so a tee shot in the middle with a draw or slightly left can easily run into the rough. The green is protected in the front right by 2 sand bunkers and some moguls and on the left and back by a steep dropping slope to a gully 8 - 10 feet below the green. The back to front slope mandates landing on the front. There is a very small opening to the green for shots that are on target to but a little short. If you wonder why this is the highest handicap hole on the course, you’re not alone.
• • • 351 315 293 -
Hole #13
Men's Handicap: 4
Women's Handicap: 2
Hole 13
Par 4
The par 4 number 13 sports a strong dogleg to the right with a landing area protected by 2 left bunkers and 1 right. Additional moguls and rough may leave you blocked by trees should you miss the fairway. Too long on the left and you’re in the trees, and long down the middle will put you in the wetlands so choose your tee club wisely.. The forward sloping green is protected by grass and sand bunkers on the right and a sand bunker on the left that will trap pulled shots that manage to clear the wetland hazard. It’s a long bunker shot to get on the green. An approach shot on the green above the hole may just have you wishing you’d caught the back bunker. Front of the pin is your only hope for a par and birdies aren’t unusual.
• • • 353 317 283 -
Hole #14
Men's Handicap: 12
Women's Handicap: 4
Hole 14
Par 4
Number 14 is a 90 degree dogleg right and your tee shot needs to carry at least 220 yards down the center to open a clear line to the green. The shorter hitters must keep their tee shots on the left side of the fairway to maximize the sight line to the green. Your approach shot will be with a short iron downhill to a green surrounded by moguls with sand bunker on the front right. This forward sloped green has many subtle breaks to read but it’s a birdie opportunity for lower handicap players and a par 4 for the rest.
• • • 361 330 300 -
Hole #15
Men's Handicap: 14
Women's Handicap: 16
Hole 15
Par 4
The 15th is a straight away par 4 with the sand bunkers on the left and right of the landing area. While a 225 yard drive will clear the bunkers, a shorter tee shot will avoid the bunkers and still have a clear shot into the green. The green is protected on the right by a bank that will kick the ball to the right of the green if hit and if the pin is towards the front you will have a very difficult time getting the ball close enough on your chip to 1 putt. The angled and narrow green provides a small target so higher handicap players may target the forgiving left bunker with difficult pin placements. The long and narrow green is angled 45 degrees to the left giving the player a small target to play to on the approach shot.
• • • 378 318 260 -
Hole #16
Men's Handicap: 8
Women's Handicap: 6
Hole 16
Par 5
The par 5 16 is a dogleg right with 2 very large trees protecting the corner so right side tee shots often eliminate the outside chance of a 2 shot to the green. However, even a shorter left side tee shot will still have a clear layup. A 250 yard drive from the back of the whites will put you in the dogleg with a straight shot to the green. However, only the longest of hitters will reach the green from there. The green is protected by a grass bunker and a sand bunker on the right front and a large sand bunker on the left. If the pin is not toward the front of the green, avoid the left bunker at all cost. The large green with a mild a bowl shape slopes forward and a front pin placement is much preferred.
• • • 544 477 392 -
Hole #17
Men's Handicap: 2
Women's Handicap: 18
Hole 17
Par 4
Number 17 is a straight away par 4 with lateral hazard all the way down the left side and out of bounds to the right. A rescue club or iron off the tee is advised due to the huge advantage the fairway provides, despite the longer approach shot. Accuracy is paramount. Anything in the middle to left side of the fairway can send the ball off the left into a deep valley bordered by wetlands. If you can avoid the 3 deep sand bunkers at the left front, the small opening in the right front will take a short approach shot. But even slightly right will push you into the right fringe and require a good recovery chip. The atypical rear sloped green is larger than it appears but will roll any ball on the back two thirds onto the rear fringe.
• • • 377 328 240 -
Hole #18
Men's Handicap: 10
Women's Handicap: 12
Hole 18
Par 3
The par 3 number 18 features two sets blue tees. Pick your poison. The white tee ranges from 146 - 172 yards and you’ll need to carry the ball over at least 125 yards of water. The red tee plays from 96 – 109 yards with about a 70 yard water carry. The sand bunker protecting the left side and back of the green also serves as a lateral hazard. Too much club will cost you a least one stroke. The 2 tiered green has a 3 foot uphill approach to the upper tier so in the event of an upper tier pin placement, do your very best to land it on the top tier. Both the upper and lower tiers have a lot of breaking putts so getting a 2 putt par or a birdie is not a cinch even with a good tee shot into the green. It is a great finishing hole.
• • • 192 149 102


